Friday, 26 August 2016

Complete Wizard!

So, after finishing my Warhound model off (the Luggage from Terry Pratchets 'Discworld' series) I've found myself full of excitement and inspiration to carry on painting my warband to completion.

I was trying to decide what to paint next, my wizard model (Bursar) or my apprentice one (Ponder Stibbons). Decided I wasn't sure how I was going to paint my apprentice yet, so went with my wizard. 

This was the first time I've done any proper layering while painting, and I think I've done a half decent job, especially on his cloak.


All the red parts took me about an hour/hour and a half in total, with everything else taking another hour. So all in all, not a long project, but I was determined to get him looking good. I added a little detail to the front and then painted to wonky eyes, which I have to say, I love.


And that's that. Only 1 model to go now until they're all finished...for now.

Thanks for stopping by!


Wednesday, 24 August 2016

My Warhound is finished!

I had a rare morning off work today and decided to finally paint the model I'm using as my Warhound in my Frostgrave War Band. Rather than an actual dog, I'm using the Luggage from the Discworld series. I think I did a decent paint job on what is quite frankly a beautiful model. I've been terrified of starting it, because of the amount of flesh needed for the legs. I've only recently started painting flesh, having only previously painted robotic miniatures. 


I'm happy with the end result anyway, can't wait to get him on a table along with the rest of my gang!

Thanks for stopping by!

Tuesday, 23 August 2016

That's the soldiers finished!

So, this morning I finally finished painting my soldiers for my Frostgrave Warband. Below is a picture of the gang all together! Next step is to paint my Warhound, apprentice and wizard! Looking forward to cracking on with them now!


Sunday, 21 August 2016

Gaming table construction!

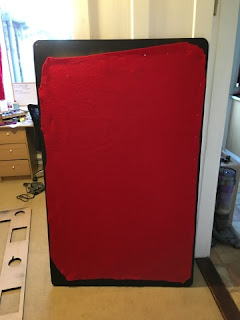
So, recently I tidied and organised my would be dining room and decorated and displayed things to turn it into my new 'Geek Den'. This went down well the next time I was hosting my D&D group, as it saved us all huddling around the coffee table. However, as I'm sure you are all aware, there is always that itch to improve. So, with that in mind, I took to the internet to see how much one would cost to buy/build. The designs I found were all a bit more complex than what I was looking for and to buy one was completely out of the question. So, I sat and thought things out and, with a little help from my fellow geek Mike, I came up with the basic design for my table. Below is the step by step of how I built it and a cost up too.

Step 1

First off, get yourself 2 MDF boards. I got 3/4" thick, but to be honest I think 1/2" would do it too. I used 38"x62". Mark up on one of these where you are going to cut out. I wanted a 2'x4' gap in the middle, leaving a 7" border. I put dice trays and cup slots around the edge, but these are just extras and not needed really (unless you've got badass taste).


Step 2

Now for the scary part (unless you're actually good with tools). I drilled holes in order to get the jigsaw in and then cut out everywhere I marked up. There are better ways to cut circles than what I did, which was to do it by hand with the jigsaw. I cut the corners here too, to round them off (Screw the two boards together and cut the corners together to make sure they match up). Once they are all cut out, you can lay it on top of the bottom piece, just to get an idea of how it will look and get all excited like a little girl (like I did).


Step 3

This is the tidying up step. Now is the time to sand all the edges and sides to smooth them off and check, double check and then triple check that 2 2x2 boards will fit in the gap. Make sure everything is as you want it now, as next its all cosmetic!


Step 4

Now that it's all cut and ready, its time to seal it. Not 100% if you need to do this, but I felt better knowing it was done. Plus it works nicely as a primer for what comes next; the paint!

I used a Satin black car spray from Halfords, but really you can use whatever you want to paint it. Whatever you chose, you'll want to paint about 4" or 5" in from the edge on the bottom layer, and then all the edges and all the top layer. Then, once this is dry, staple some felt to the bottom layer. I went with red. We are nearly done.


Step 5

I used red mouse mats to cushion the dice trays. I stapled them to the bottom of the top layer, to keep them in position. Once all these are on, its a case of screwing both boards together. I used 1.25" screws, screwing from the bottom to keep the top border nice and clean. I used spare bits from the cut up mouse mats to pad the drinks slots and then printed and laminated some bits just to decorate them a bit more (I have different D&D phrases written in Gallifreyan)


And that, my friends, is it. You now have a pretty awesome gaming table. I just use an occasional table that folds away to place it on top of, but you can always attach legs of whatever and keep it up permanently. 


Expenses

- Wood = £35
- Felt = £4.57
- Mouse mats = £11.94
- Spray paint = £7.99
- PVA sealant = £5.99

Total cost = £65.49

Mine cost me slightly more, but that's because I paid delivery for the wood, and had to buy some tools, or bits for tools. Even with those added on though, still well under £100

Enjoy guys!


Thursday, 18 August 2016

More progress

Between work and my, admittedly limited, social life, I haven't done much hobbying recently. So, after getting home at nearly 11pm last night, I decided to crack on and finish another couple of guys. Here are the four I have finished for my warband.

Soon be time to paint my wizard!


Thanks for stopping by!

Tuesday, 16 August 2016

Getting some work done!

So, I was recently introduced to Frostgrave (thanks Mike and Pete) and I have to say, I love it! Such a simple system, but so much fun to play.

So I've built up a war band and have started painting them. Here's a picture of the first 2 I've finished, a thief and a thug. 


As you can see, the war band colour is Red, as my wizard is a flame throwing elementalist! Looking forward to painting some more over the next few days, hoping to have the majority done by the end of next week.

Thanks for stopping by!

Frostgrave Progress!

So, I had my second game of Frostgrave on Sunday night. I'm really enjoying this system, so easy to play and very fun! 

This time I played against Mike and his Necromancer band. We both suffered quite a few casualties, though Mikes dead pile was considerably more expensive than my own. We played 'The worm hunter' mission and with the worm eventually turning up 2 turns before we finished, my ranger killed it, earning my wizard an extra 100xp. Going up 4 levels this time, my wizard is now a mighty level 7. He managed to kill Mikes wizard, the same as Petes (sorry, not sorry).

I can't wait to get finished painting my models, and start trying new units. Unfortunately, I didn't think to take any pictures, which is a shame as the table Mike prepared was pretty magnificent, and his stuff always looks nice when painted.

Wednesday, 10 August 2016

Introducing the Terrifying, the Stupendous, the Amazing Spider-Man!

So early this week I posted about the first project I've embarked on over a year! It's the Marvel Knight Amazing Spider-Man, and I've had a load of fun painting it. 

I'll not bore you with the details, but it is such a lovely model! A few issues with the amount of flash on it, and some of sockets didn't line up properly. The spider emblem on his chest isn't as defined as it could be, making it near impossible to pick out with paint. Other than that though, it's beautiful! So, here are the pictures! Hope you like it guys!


Tuesday, 9 August 2016

My second project!

So, as well as my Spider-Man figure, I'm also going to be working on my blood bowl team. I've never played but always wanted to, and a friend of mine (cheers Mike!) donated this Vampire team to me.


So, they are all based and under coated and I'll be starting work on them some time this week. I'm thinking for team colours, I might go with a green and silver theme (think Slytherin Quidditch team and you've got it).


Stay tuned!

First project in a long time!

So, I'm just getting back into hobbling in general. Decided to finally start work again, and what better way to get back into painting than by working on my Marvel Knights Spider-Man figure. It's been sat in my to do box for a year now, so I'm glad to finally be getting around to doing it!


The figure itself is really nice, but it had quite a lot of flash to sort out. It was a bit of a pain to glue together too, to the point I nearly pined it. But it's held and I've had no issues since.


So now it's sat, under coated ready for me to paint. I'll be doing a bit tonight so maybe a post will go up tomorrow. 

Stay tuned guys!

Fresh start


So, it's been a while since I've posted on here. A lot has happened in a relatively short space of time. So, here's what I'm doing now.

I have moved house, and have created a new space for myself. I have christened it 'The Geek Den' and I'm using it for all manner of things. I've got a desk set up for my paint station, a fold away table that's almost perfect for gaming, a nice stereo system and bookshelves aplenty to display all my Doctor Who stuff. There are a couple of picture below. It is a work in progress but I'm very happy with the progress so far! Now that I have a space to paint, I'd best get some done! See future posts for my current projects!